This entry documents part of my journey in restoring a Deckel FP2 Milling Machine, I will share the story on how I got the machine in a separate post, a rare tool in Africa. It does not help that this is my first on making a boring bar for threading, grinding the HSS tool with 30 degree included angle, adding side relief, and finally cutting a deep internal thread. I could not find any information on dimensions on the internet so I have taken the decision to share my experience.
The boring bar was made from a length of 15mm drill rod, with a 4mm hole for the HSS tool bit. The flex in the bar made me think a line boring setup might be better suited for production runs, not sure if this is standard practice.
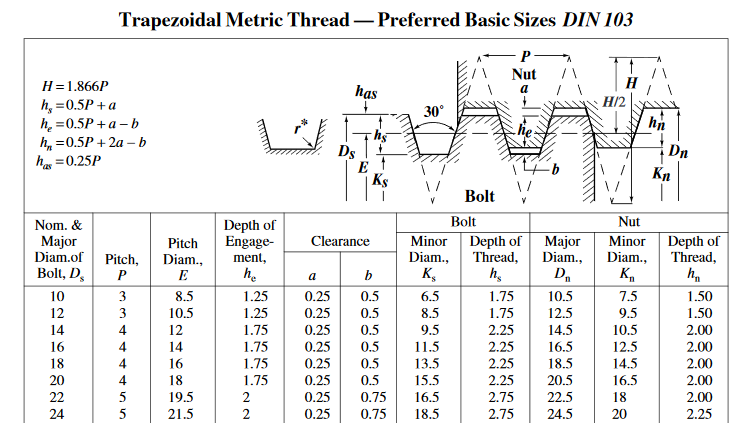
The Trapezoidal Thread for my Deckel FP2 X Axis Spindle, dimensions are close to DIN103, although my machine sports a 4mm pitch. My readings indicate this is not standard to DIN103. Initially I started with ISO 2904-1977 but soon realized the bore of 19mm does not fit the Deckle Spindle, then had to re-bore :/
Ks measured at 19.5mmKn (Nut bore diameter) should be 20mm
Dn kept at 24,5mm

For Inside Threads, the correct bore size is important, before threading commences.
Step 1 - Ensure inside bore size is correct on entire length of bore. Difficult to fix bore after threading has started, would require new setup/feed speed changes etc. Not good.
Step 2 – Boring bar is parallel to work, insert is at correct height, for brass bronze no back rake. i.e. tool should be perpendicular to work.
Step 3 – tool post is clamped down hard, (with deep internal thread this caused a problem since boring bar shifted, and had to be realigned. Compromising thread quality)
Step 4 – compound should be at 0,5deg less than half the included angle of thread, see infeed methods below. - 14,5 for Trapezoidal internal thread. Slanted back /. http://www.mmsonline.com/articles/threading-on-a-lathe
Step 7 – scratch pass, to establish if feed is correct.
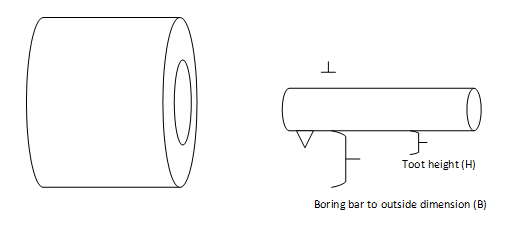
Step 6 - Use boring tool to outside diameter of nut to determine thread depth. Subtract tool height.
Keep going until measurements get close, start fit testing.

Outside dimension – (( B – H ) * 2 ) = thread depth
| soll wert | ist wert | |
| outside diameter | 45 | 50,457 |
| boring bar to outside | 16,8785 | 17 |
| Tool height | min 2,5 | 3,9 |
| Thread depth | 24,5 | 24,257 |

No comments:
Post a Comment